The Ultimate Guide to Dollhouse Roof Shingles: Ideas, Materials & DIY Tutorials
In the intricate world of dollhouse creation, the roof is more than just a cover; it’s the crown jewel. It’s the single largest surface that defines the character, era, and story of your miniature home. The right roofing can transform a simple wooden box into a stately Victorian manor, a charming country cottage, or a rustic woodland cabin. But for many miniaturists, both beginners and seasoned artisans, the prospect of roofing can be daunting. What materials should you use? How do you achieve that perfect, realistic look? How do you even begin to make your own shingles?
Fear not. This is your definitive, encyclopedic guide to the art and craft of dollhouse roofing. We will journey through a world of incredible ideas to spark your imagination. We’ll perform a deep-dive analysis of every conceivable material—from classic wood shingles for your dollhouse to realistic dollhouse asphalt roof shingles—exploring the pros, cons, and best uses for each. And most importantly, we will provide three incredibly detailed, step-by-step tutorials that teach you exactly how to make dollhouse roof shingles from scratch.
Whether you’re finishing a high-end kit or figuring out how to top the structure you built from our guide on how to make a dollhouse from cardboard, this guide has you covered. Prepare to elevate your craft and give your miniature home the magnificent roof it deserves.

Choosing Your Roofing Style: A Quick Comparison
Before we dive deep, here’s a quick-glance table to help you understand the trade-offs between the most popular dollhouse roofing materials.
| Material | Realism | Average Cost | Difficulty Level | Best For |
|---|---|---|---|---|
| Wood Veneer Shingles | High | Moderate | Moderate to High | Farmhouses, cabins, Tudor and Colonial styles. |
| Asphalt (Sandpaper) | High | Low | Low to Moderate | Modern homes, suburban houses, garages, sheds. |
| Paper/Cardstock | Moderate | Very Low | Low | Beginners, budget projects, creating slate or tile effects. |
| Real Slate/Stone Tiles | Very High | High | High | High-end Victorian manors, castles, French country homes. |
| Polymer Clay Tiles | High | Moderate | High | Spanish villas, terracotta styles, fantasy houses. |
Part 1: A World of Inspiration – Dollhouse Roofing Ideas
The first step is to dream. The style of roof you choose will set the entire mood for your project. Are you building a dark and moody gothic mansion or a bright and cheerful beach bungalow? Let these ideas spark your creativity.
Classic Victorian Slate
Think of the intricate, multi-gabled roofs of San Francisco’s “Painted Ladies.” A Victorian roof is all about texture and pattern. Use individual, diamond-shaped or fish-scale shingles cut from thin cardstock or polymer clay. Paint them in varying shades of gray, charcoal, and even hints of dark green or purple to mimic natural slate. This style is perfect for complex rooflines with turrets and dormers, creating a stunningly detailed and historically accurate look.
Rustic Wood Shake
For a cabin in the woods, a pioneer’s home, or a rustic lodge, nothing beats the look of hand-split wood shakes. These shingles are thicker and more irregular than uniform shingles. Use real wood veneer strips and intentionally cut them with slight variations in width and length. Age them with a mix of gray and brown stains, and don’t be afraid to add a touch of moss (using fine flocking powder) for a truly authentic, lived-in feel.
Charming Cedar Shingles
This is the quintessential American look, suitable for everything from a Cape Cod cottage to a sprawling Colonial home. These are typically uniform, rectangular shingles. Thin wood veneer is the ideal material. You can leave them in their natural, light wood tone, stain them a warm reddish-brown to mimic cedar, or paint them a weathered gray for a coastal vibe. The clean lines and satisfying pattern make this one of the most popular choices.
Mediterranean Terracotta Tiles
To capture the sun-drenched feel of a Spanish or Italian villa, you need the iconic look of curved terracotta tiles. This is a more advanced technique, often requiring you to form individual tiles from polymer clay. The half-round, overlapping shape creates beautiful shadow lines. Paint them in warm tones of ochre, orange, and dusty red. This style is a showstopper but requires significant patience.
Modern Standing-Seam Metal
For a contemporary dollhouse or a modern farmhouse, a metal roof is a sleek and stylish choice. You can replicate this look easily using corrugated cardstock or by scoring lines into a sheet of metallic silver poster board. Paint it dark gray, black, or even a bold color like barn red for a striking, clean aesthetic that contrasts beautifully with wood siding.
No matter the style, remember that a roof is never a single, flat color. Real roofs are weathered by sun, rain, and time. Always use multiple shades of your chosen color to add depth and realism to every shingle.
Part 2: The Miniaturist’s Material Deep Dive
Now that you have an idea, let’s talk materials. The material you choose impacts the look, the cost, and the process. There’s no single “best” material—only the best material for *your* project.
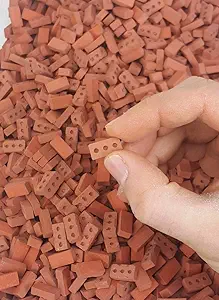
Wood Shingles: The Authentic Classic
When you think of wood shingles for a dollhouse, you’re thinking of the gold standard for realism and charm.
- Pros: Unmatched authenticity, beautiful natural grain, can be stained or painted, very durable.
- Cons: Can be expensive to buy pre-cut, time-consuming to make yourself, requires precision cutting.
- Best For: Any project where natural texture and high realism are a priority. Farmhouses, Tudor manors, log cabins, and colonial homes are perfect candidates.
- Pro Tip: Use ultra-thin (1/64″) wood veneer sheets, often sold for marquetry. They are easy to cut with a sharp craft knife and have a perfect scale thickness. Avoid thick craft sticks, which look bulky and out of scale.
Asphalt Shingles (Sandpaper): The Popular Workhorse
This is arguably the most popular DIY method for a reason. Using fine-grit sandpaper is an ingenious way to replicate the texture and look of modern dollhouse asphalt roof shingles.
- Pros: Incredibly cheap, easy to find, perfect texture, available in various colors (black, gray, brown), easy to cut and apply.
- Cons: Less suitable for historical projects, can look too uniform if not weathered properly.
- Best For: Post-war suburban homes, modern architectural models, garages, and any structure where a standard asphalt roof is appropriate.
- Pro Tip: Use a fine grit (220 or higher) wet/dry sandpaper. The paper backing is more durable and less likely to tear. After gluing the shingles down, dust them lightly with different shades of gray and brown chalk pastels to break up the uniform color and create a weathered look.
Paper & Cardstock: The Budget-Friendly Champion
Never underestimate the power of paper! With the right techniques, simple cardstock can be transformed into surprisingly realistic slate tiles, wooden shakes, or even fancy patterned shingles.
- Pros: Extremely cheap, available in any color imaginable, easy to cut into complex shapes (like fish scales), lightweight.
- Cons: Lacks natural texture, can be damaged by moisture if not sealed properly, can look flat if not painted with variation.
- Best For: Beginners, budget builds, and styles that require intricate shapes like Victorian houses. Perfect for creating a slate tile look.
- Pro Tip: After cutting your cardstock shingles, paint them *before* applying them to the roof. Use a sponge to dab on multiple shades of acrylic craft paint to create texture and color variation. Once installed and the glue is dry, seal the entire roof with a matte spray sealant (like Testors Dullcote) to protect it from humidity and give it a uniform finish.
Part 3: The Ultimate DIY Guide – How to Make Dollhouse Roof Shingles
Ready to get hands-on? Here are three complete, step-by-step tutorials for making the most popular types of dollhouse shingles. Remember to work in a well-lit area and always be careful when using craft knives.
Tutorial #1: Crafting Classic Wood Shingles (1:12 Scale)
This method yields beautifully realistic wood shingles perfect for a huge range of house styles.
Materials Needed:
- Thin wood veneer sheets (1/64″ thickness is ideal) in a light wood like birch or basswood.
- A sharp craft knife or X-Acto blade.
- A self-healing cutting mat.
- A metal ruler with a cork back (to prevent slipping).
- Wood stain in various shades (e.g., oak, walnut, gray).
- A small brush and clean rags.
- Tacky glue (like Aleene’s Tacky Glue).
Step-by-Step Instructions:
- Prepare Your Veneer: Lay your wood veneer sheet on the cutting mat. The grain of the wood should run vertically along what will be the length of your shingles.
- Cut the Strips: Using your metal ruler and craft knife, carefully cut the veneer into long strips. For standard 1:12 scale, a good shingle height is between 3/4″ and 1″ tall. So, cut your sheet into many 1″ tall strips.
- Cut the Individual Shingles: Take your 1″ tall strips and now cut them into individual shingles. A standard width is about 3/4″. For a more rustic look, you can slightly vary the width of each shingle. Press firmly and use multiple passes with the knife for a clean cut. You will need hundreds of these, so be patient!
- Age & Distress (Optional but Recommended): For a weathered look, you can distress the shingles before staining. Gently drag your craft knife along the bottom edge of some shingles to create a rougher, hand-split look. Lightly sand the corners of others.
- Stain for Realism: This is the magic step. Use a rag or brush to apply stain to your shingles. Don’t stain them all one uniform color! Stain some light, some dark, and mix stains on others. Let some absorb more stain than others. This variation is the key to realism. Wipe off excess stain and let them dry completely on a paper towel.
Tutorial #2: Creating Realistic Asphalt Shingles
This budget-friendly method is fast, easy, and looks fantastic on modern or mid-century homes.
Materials Needed:
- Fine-grit sandpaper (220 grit or higher) in black or dark gray.
- A craft knife and/or sharp scissors.
- A self-healing cutting mat.
- A metal ruler.
- Tacky glue or a hot glue gun.
Step-by-Step Instructions:
- Prepare the Sandpaper: On the back (paper side) of the sandpaper, use a pencil and your ruler to draw your cutting lines. You’ll be making long strips.
- Create the Shingle Strips: A typical three-tab asphalt shingle strip in 1:12 scale would be about 1″ to 1.25″ tall. Cut the sandpaper into many long strips of this height.
- Cut the Tabs: Take each strip and, along one of the long edges, cut notches to create the “tabs.” A standard three-tab shingle would have two notches, creating three equal tabs. For architectural shingles, you can cut the bottom edge in a staggered, random pattern. Scissors often work better than a knife for this step.
- Add Detail & Weathering: Before installing, gently bend and flex the strips to give them a less rigid look. Once they are glued to the roof, you can add incredible realism by using a tiny bit of black paint wash in the cracks, followed by a light dusting of gray or brown chalk pastels to simulate age and dust.
Part 4: The Art of Installation – A Step-by-Step Guide
Making the shingles is half the battle; applying them correctly is what brings the project to life. This process is the same for most shingle types.
- Prepare the Roof Base: Your roof should be smooth and clean. Many miniaturists paint the roof a dark color (like black or brown) before starting. This helps hide any small gaps that might appear between shingles.
- Draw Guidelines: This is the most important step! Use a pencil and a ruler to draw parallel horizontal lines up your roof. The distance between these lines should be the amount you want your shingles to be exposed. For a 1″ tall shingle, a 1/2″ or 3/4″ exposure looks good. These lines will keep your rows perfectly straight.
- The First Row: The very first row of shingles at the bottom edge of the roof should be applied upside down (or as a solid strip) to provide a solid base for the first visible row.
- Start Shingling!: Begin the first visible row. Apply a thin bead of tacky glue along your first guideline. Press each shingle into place. The bottom of the shingle should align with your guideline.
- Master the Overlap: When you start the second row, place the first shingle so that its center covers the gap between the first two shingles of the row below it. This staggered pattern is essential for a realistic look. Continue this process, following your guidelines all the way to the top.
- Capping the Ridge: To finish the peak of the roof (the ridge), you’ll need to create a ridge cap. You can do this by gluing two shingles together to form a V-shape, or by using a single, wider shingle that you fold over the peak. Start at one end and overlap these ridge shingles all the way across.
Part 5: The Miniaturist’s Toolkit – Essential Supplies
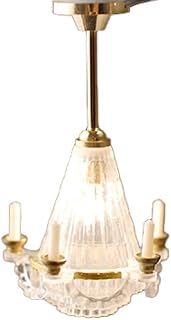
Having the right tools makes all the difference. While you’re crafting your roof, consider how the final details, like interior lights, will showcase your work. Adding one of the best dollhouse lighting kits can create dramatic shadows that highlight the texture of your beautiful new roof.
Self-Healing Cutting Mat
Absolutely essential. Protects your work surface and keeps your blades sharp. A must-have for any serious crafter.
View on Amazon
Precision Craft Knife Set
A sharp, comfortable knife is your best friend. A set with multiple blade shapes is perfect for cutting wood, paper, and sandpaper.
View on Amazon
Aleene’s Original Tacky Glue
The go-to glue for miniaturists. It grabs quickly but gives you enough time to position your shingles perfectly. Dries clear and strong.
View on AmazonFrequently Asked Questions
What is the most realistic dollhouse roofing material?
For ultimate realism, individual shingles made from real slate or thin wood veneer are the top choices. They have natural texture, color variation, and thickness that is difficult to replicate perfectly with other materials. However, they are also the most time-consuming and expensive options.
How many shingles do I need for my dollhouse roof?
To estimate, first calculate the surface area of your roof (Length x Width). If you have a standard peak roof, do this for both sides and add them together. Then, calculate the area of one shingle (e.g., 1″ x 0.75″ = 0.75 square inches). Divide the total roof area by the exposed area of one shingle (e.g., 0.75″ width x 0.5″ exposure = 0.375 sq. in.). Always add at least 15% extra to account for waste, mistakes, and ridge caps.
What’s the best glue for dollhouse shingles?
A thick, white PVA glue like Aleene’s Original Tacky Glue is the most recommended. It’s strong, dries clear, and has a thick consistency that prevents shingles from sliding down the roof while they dry. For some applications, like ridge caps, a hot glue gun can also be useful for an instant bond.